



 ProRealCode - Trading & Coding with ProRealTime™



Sweep Reversal Map
Introduction
Every liquidity tool on the market draws the same thing: a swing high gets taken out, a marker appears. The problem is that the marker appears whether or not anything came of it. Price pokes above a swing on its way up and keeps going: marker. Price pokes above a swing, snaps back and collapses: same marker. On a chart with a hundred of them, the ones that mattered are indistinguishable from the ones that did not, and the tool has told you nothing you could not see yourself.
Sweep Reversal Map, designed by Herman, refuses to commit until the reversal has happened. A sweep opens a candidate, not a signal. The candidate then has a fixed number of bars to prove itself by breaking the structure that existed before the sweep. If it does, the zone is confirmed and stays on the chart. If it does not, the candidate is deleted – it leaves no trace at all.
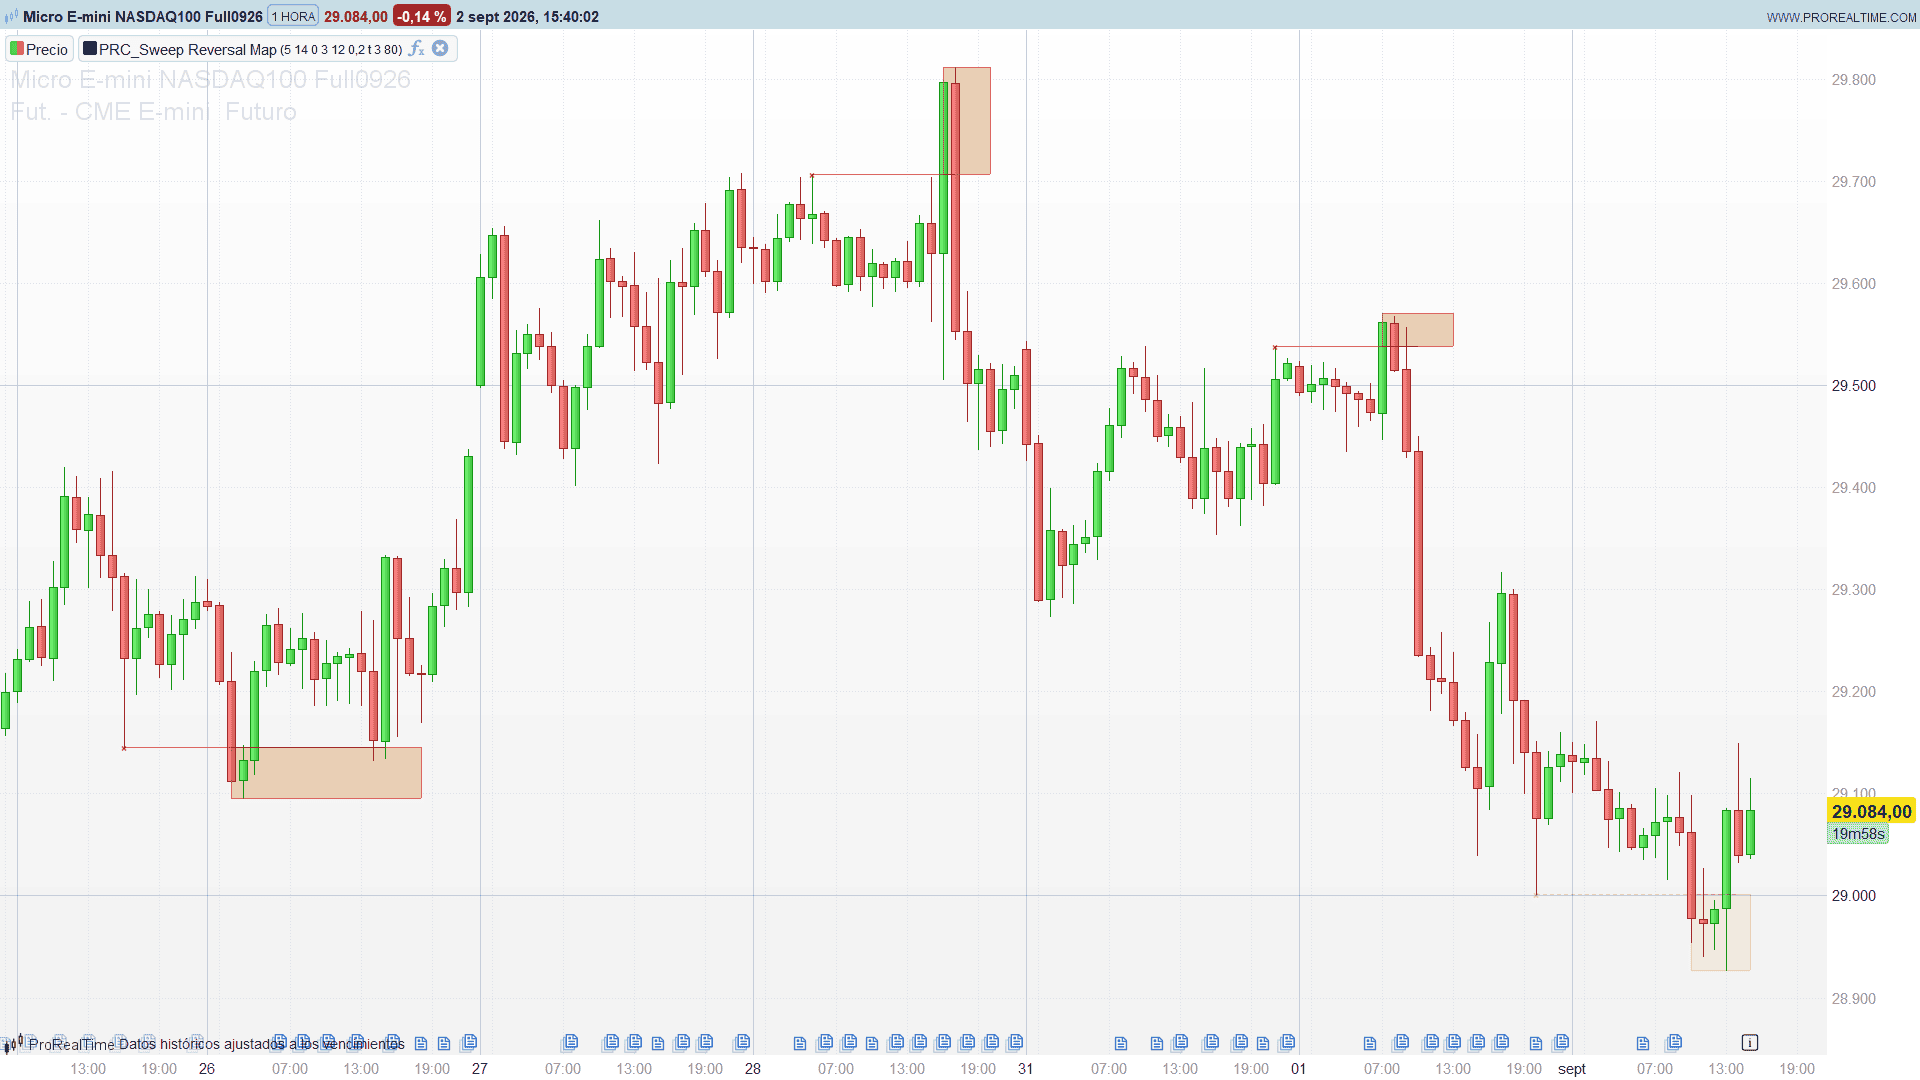
What is left on the chart is therefore not a map of liquidity grabs. It is a map of the liquidity grabs that worked.
The Level That Gets Taken
The levels are ordinary swing pivots: a high with swingLen bars on each side that are lower than it, confirmed swingLen bars after the fact. Nothing exotic, and that is the point – the stops sitting above a visible swing high are the whole reason the level is worth sweeping.
There is one rule that matters more than it looks. A confirmed swing is marked as available, and the first sweep consumes it. It cannot generate a second candidate, ever. Price returning to nibble at the same high three more times produces nothing. Without that rule, a level that price hovers around would spawn a candidate on every bar and the chart would be unreadable within a session.
The Sweep, and What Gets Frozen With It
A sweep is the bar whose high goes beyond the swing high by at least minPen times ATR (with the default of zero, simply touching it is enough). At that instant three things are captured and never recalculated:
- the swept level itself, which is the price the stops were sitting at,
- the structure level: the lowest low of the
structLenbars that came before the sweep bar, - and the running extreme of the sweep, the highest high reached from here on.
The second one is the important one. The bar that goes hunting for liquidity is very often a big bar, and a big bar drags the recent lows down with it. If the level to break were recomputed as price moved, the sweep would be lowering its own bar and almost everything would confirm. Freezing it means the candidate has to break the structure that existed before anyone went for the stops. That is the difference between a reversal and a bar that merely closed red.
The third one, the running extreme, is what gives the zone its height: the box spans from the swept level up to the furthest price reached during the raid. It is the wick that ate the liquidity, drawn to scale.
The Confirmation, and the Deadline
A candidate confirms when three conditions line up, all within maxConfBar bars of the sweep:
- Reclaim. Price has closed back on the correct side of the swept level at least once. Trading above the level is not a sweep, it is a breakout; the reclaim is what separates the two.
- Break of structure. A close beyond the frozen structure level.
- Displacement. That closing candle needs a body of at least
minDisptimes ATR. A doji drifting through the level does not count as a reversal, and this filter is what keeps slow sideways drift out of the map.
Miss the deadline and the candidate is discarded. Not greyed out, not marked as failed – gone. This is a deliberate design choice and it is the reason the finished chart is worth reading: what remains has, by construction, passed the test.
Both directions run at the same time and independently. A swing high being swept while a swing low candidate is still alive is a perfectly normal state.
What You See on the Chart
Three drawings per confirmed setup:
- a box from the sweep bar to the confirmation bar, spanning from the swept level to the extreme of the raid, extended
confExtbars to the right, - a line at the swept level running back to the pivot it belongs to, so you can see how far back the liquidity had been resting,
- and a cross on that pivot, marking the exact point the money was taken from.
While a candidate is alive, the same three drawings appear in a much fainter shade and the box grows with each new bar. Turn showDev to zero if you only want the finished map.
The whole map is repainted from a ring buffer on the last bar, which is what lets a live, growing zone and a frozen history coexist without the history being wiped every time a bar closes. maxHist sets how many confirmed setups are kept; each one costs three drawings, so 80 setups means 240 objects on one pass. If the chart feels heavy, that is the number to lower first.
The Code
//----------------------------------------------
//PRC_Sweep Reversal Map by Herman
//version = 1
//02.09.2026
//Ivan Gonzalez @ www.prorealcode.com
//Concept and design: Herman - MPL 2.0
//Sharing ProRealTime knowledge
//----------------------------------------------
// Overlay indicator. It maps the liquidity sweeps that actually reversed: a
// confirmed swing high (or low) is taken out, price closes back through it, and
// the reversal is only accepted when the local structure built by the bars
// preceding the sweep is broken within a few bars by a candle with real body.
// The zone between the swept level and the extreme of the sweep is the box.
//
// A drawing cannot be edited once it is on the chart, so every confirmed setup
// is pushed into a ring buffer and the whole map is repainted on the last bar
// under drawonlastbaronly: a growing zone and a frozen history on one chart.
//----------------------------------------------
defparam drawonlastbaronly = true


// === 1. DETECTION ===
swingLen = 5      // bars on each side required to confirm a swing (2..50)
atrLen   = 14     // ATR period used by the penetration and displacement filters
minPen   = 0.0    // minimum penetration beyond the level, in ATR (0 = any breach)


// === 2. CONFIRMATION ===
structLen  = 3    // bars before the sweep that define the local structure level
maxConfBar = 12   // maximum bars between the sweep and the confirmation
minDisp    = 0.2  // minimum confirmation body, in ATR (0 = filter off)


// === 3. STYLE ===
showDev = 1       // 1 = draw the faint zone while a sweep waits for confirmation
confExt = 2       // bars a confirmed zone is extended to the right
maxHist = 80      // confirmed setups kept on the chart (3 drawings each)
zoneR = 194       // reversal zone, dark amber
zoneG = 97
zoneB = 10
lvlR = 192        // swept level and marker, brick red
lvlG = 57
lvlB = 43


// === 4. PERSISTENT STATE ===
// One slack slot on the ring: it is written from the live bar, so the write
// position must never belong to the read window.
ringSz = maxHist + 1
pivWin = 2 * swingLen + 1


once nSet = 0          // confirmed setups pushed so far
once swHiOk = 0        // a fresh swing high is waiting to be swept
once swLoOk = 0
once lastSwHi = 0
once lastSwLo = 0
once lastSwHiX = 0
once lastSwLoX = 0
once bearOn = 0        // a bearish candidate is alive
once bearRec = 0       // price has already closed back below the swept level
once bearStart = 0
once bearLev = 0
once bearExt = 0
once bearCfLev = 0
once bearPvt = 0
once bullOn = 0
once bullRec = 0
once bullStart = 0
once bullLev = 0
once bullExt = 0
once bullCfLev = 0
once bullPvt = 0


// === 5. SERIES ===
atrRaw = averagetruerange[atrLen](close)
pivHi = highest[pivWin](high)
pivLo = lowest[pivWin](low)
strLo = lowest[structLen](low)
strHi = highest[structLen](high)


// first bar on which every window the engine needs is complete
wUp = max(2 * swingLen, structLen)


// === 6. ENGINE ===
// The engine has to advance exactly once per CLOSED bar. ProRealTime recomputes
// the live bar on every tick, so it is fed with the last closed bar: every read
// and every anchor is shifted one bar TOGETHER, condition and coordinate always
// belonging to the same candle. Side effect worth having: inside the live bar
// the engine always reads the same data, so each write into the ring is idempotent.
if barindex > wUp then


   cIdx = barindex - 1
   cHigh = high[1]
   cLow = low[1]
   cClose = close[1]
   cBody = abs(close[1] - open[1])


   // ATR is undefined during its warmup: it counts as zero for the penetration
   // and it switches the displacement filter off until it exists.
   atrOk = 0
   atrV = 0
   if atrRaw[1] <> undefined then
      atrOk = 1
      atrV = atrRaw[1]
   endif
   penAbs = atrV * minPen
   dispOk = 0
   if atrOk = 1 and cBody >= atrV * minDisp then
      dispOk = 1
   endif


   // structure of the structLen bars that PRECEDE the closed bar
   priorLow = strLo[2]
   priorHigh = strHi[2]


   // --- confirmed swings, swingLen bars on each side ---
   if high[swingLen + 1] = pivHi[1] then
      lastSwHi = high[swingLen + 1]
      lastSwHiX = cIdx - swingLen
      swHiOk = 1
   endif
   if low[swingLen + 1] = pivLo[1] then
      lastSwLo = low[swingLen + 1]
      lastSwLoX = cIdx - swingLen
      swLoOk = 1
   endif


   // --- bearish candidate: price sweeps a confirmed swing high ---
   if bearOn = 0 and swHiOk = 1 and cHigh >= lastSwHi + penAbs then
      bearOn = 1
      bearRec = 0
      if cClose < lastSwHi then
         bearRec = 1
      endif
      bearStart = cIdx
      bearLev = lastSwHi
      bearExt = cHigh
      bearCfLev = priorLow
      bearPvt = lastSwHiX
      swHiOk = 0
   endif


   if bearOn = 1 then
      bearExt = max(bearExt, cHigh)
      if cClose < bearLev then
         bearRec = 1
      endif
      if bearRec = 1 and cClose < bearCfLev and dispOk = 1 then
         slot = nSet mod ringSz
         $swX1[slot] = bearStart
         $swCf[slot] = cIdx
         $swPvt[slot] = bearPvt
         $swTop[slot] = bearExt
         $swBot[slot] = bearLev
         $swLev[slot] = bearLev
         nSet = nSet + 1
         bearOn = 0
      elsif cIdx - bearStart > maxConfBar then
         bearOn = 0
      endif
   endif


   // --- bullish candidate: price sweeps a confirmed swing low ---
   if bullOn = 0 and swLoOk = 1 and cLow <= lastSwLo - penAbs then
      bullOn = 1
      bullRec = 0
      if cClose > lastSwLo then
         bullRec = 1
      endif
      bullStart = cIdx
      bullLev = lastSwLo
      bullExt = cLow
      bullCfLev = priorHigh
      bullPvt = lastSwLoX
      swLoOk = 0
   endif


   if bullOn = 1 then
      bullExt = min(bullExt, cLow)
      if cClose > bullLev then
         bullRec = 1
      endif
      if bullRec = 1 and cClose > bullCfLev and dispOk = 1 then
         slot = nSet mod ringSz
         $swX1[slot] = bullStart
         $swCf[slot] = cIdx
         $swPvt[slot] = bullPvt
         $swTop[slot] = bullLev
         $swBot[slot] = bullExt
         $swLev[slot] = bullLev
         nSet = nSet + 1
         bullOn = 0
      elsif cIdx - bullStart > maxConfBar then
         bullOn = 0
      endif
   endif


endif


// === 7. MAP ===
// Confirmed setups are repainted from the ring, newest maxHist entries only.
if islastbarupdate then


   nDraw = min(nSet, maxHist)
   if nDraw > 0 then
      stS = (nSet - nDraw) mod ringSz
      for k = 0 to nDraw - 1 do
         s = (stS + k) mod ringSz
         drawrectangle($swX1[s], $swTop[s], $swCf[s] + confExt, $swBot[s]) coloured(zoneR, zoneG, zoneB, 242) fillcolor(zoneR, zoneG, zoneB, 70)
         drawsegment($swPvt[s], $swLev[s], $swCf[s], $swLev[s]) coloured(lvlR, lvlG, lvlB, 204) style(line, 1)
         drawtext("×", $swPvt[s], $swLev[s], SansSerif, Bold, 12) coloured(lvlR, lvlG, lvlB, 255)
      next
   endif


   // Candidates still waiting for their break of structure.
   if showDev = 1 then
      if bearOn = 1 then
         drawrectangle(bearStart, bearExt, barindex, bearLev) coloured(zoneR, zoneG, zoneB, 90) fillcolor(zoneR, zoneG, zoneB, 20)
         drawsegment(bearPvt, bearLev, barindex - 1, bearLev) coloured(lvlR, lvlG, lvlB, 64) style(dottedline, 1)
         drawtext("×", bearPvt, bearLev, SansSerif, Bold, 12) coloured(lvlR, lvlG, lvlB, 77)
      endif
      if bullOn = 1 then
         drawrectangle(bullStart, bullLev, barindex, bullExt) coloured(zoneR, zoneG, zoneB, 90) fillcolor(zoneR, zoneG, zoneB, 20)
         drawsegment(bullPvt, bullLev, barindex - 1, bullLev) coloured(lvlR, lvlG, lvlB, 64) style(dottedline, 1)
         drawtext("×", bullPvt, bullLev, SansSerif, Bold, 12) coloured(lvlR, lvlG, lvlB, 77)
      endif
   endif


endif


return
Settings
Detection. swingLen (5) is the number of bars on each side needed to confirm a swing: raise it for fewer, more significant levels. atrLen (14) feeds both the penetration and the displacement filters. minPen (0.0) is the minimum push beyond the level measured in ATR – leave it at zero to accept any breach, or set it to 0.15-0.25 on fast intraday charts where levels get grazed constantly.
Confirmation. structLen (3) is how many bars before the sweep define the level that has to break. This is the setting to think hardest about: at 3 the level is the low of three candles, which sits very close to the sweep, and a single large reversal bar clears it on its own. Values closer to swingLen make a confirmation mean considerably more. maxConfBar (12) is the deadline; shorter windows demand that the reversal be immediate. minDisp (0.2) is the minimum body of the confirming candle in ATR – set it to zero to switch the filter off, though the map gets noticeably noisier.
Style. showDev (1) toggles the faint zone shown while a candidate waits. confExt (2) is how far a confirmed box is extended to the right. maxHist (80) is the number of confirmed setups kept. The two RGB blocks set the zone colour and the level colour; the values chosen here stay legible on both a white and a dark chart background.
Notes and Limitations
A few things the tool does not do, which are worth knowing before you rely on it:
- All sweeps weigh the same. There is no scoring. A raid on a level that had been respected six times over three weeks and a raid on a two-day-old swing produce identical boxes. Volume is not consulted, and neither is how long price spent above the level.
- A confirmed zone is never invalidated. Once drawn, it stays drawn even if price walks straight back through it on the next bar. The map records what happened, not what is still valid.
- The default
structLenof 3 is permissive. With a three-bar structure level, a confirmation frequently lands on the sweep bar itself, which makes the displacement filter – not the structure break – the setting that is really doing the separating. If your confirmations feel automatic, this is why. - The engine advances on closed bars. The developing zone updates once per candle rather than tick by tick, which is intentional: a candidate that appears and vanishes inside a live bar is worse than no candidate at all.
Conclusion
The idea worth taking from this tool, whatever you end up using it for, is the frozen structure level. Any reversal detector that recalculates the level it needs to break, after the bar that was going to break it, is grading its own exam. Capturing the level at the moment of the sweep and giving the market a deadline to clear it costs three lines of state and turns a bar pattern into an actual test.
Use it as a map rather than a trigger: the confirmed zones show where liquidity was taken and defended, which is a far better place to look for an entry than the sweep itself.