Salve, vorrei sapere qual’è il modo più semplice per tenere valida una condizione per n barre. Un semplice esempio : supponiamo che dopo essere entrati long si voglia uscire dalla strategia con due condizioni, C1 e C2.
C1= rottura del massimo a 10 periodi , mentre C2 = low<low[2]. Come faccio a tener valida la condizione C1 per 10 barre, in modo che se entro 10 barre si verifica anche C2 la strategia esce, altrimenti si utilizzano altre uscite (trailing….).
Ho provato a fissare la rottura con barIndex, riprendendo un esempio dal manuale, ma sicuramente sbaglio qualcosa. Riporto un semplice esempio inventato al volo. Il problema è che il Ts non esce mai dal mercato una volta entrato.
If not longOnMarket and close>close[20] then
buy 1 contract at market
endif
hh=highest[10](high)
nBar=10
if close>hh and close[1]<hh[1] then
myBuy =close
myIndex =barIndex
endif
if barIndex<myIndex+nBar and low<low[2] then
myBuy =0
endif
if longOnMarket and myBuy>0 then
sell 1 contract at market
endif
GRAZIE
Per favore usa sempre il pulsante “Insert PRT code” quando inserisci il codice nei tuoi post per facilitare la lettura degli altri.
Grazie 🙂
Eccolo:
If not longOnMarket and close>close[20] then
buy 1 contract at market
endif
hh=highest[10](high)
nBar=10
if close crosses over hh[1] then
myBuy =close
myIndex =barIndex
endif
if barIndex>(myIndex+nBar) then
myBuy =0
endif
if longOnMarket and myBuy>0 and low<low[2]  then
sell 1 contract at market
endif
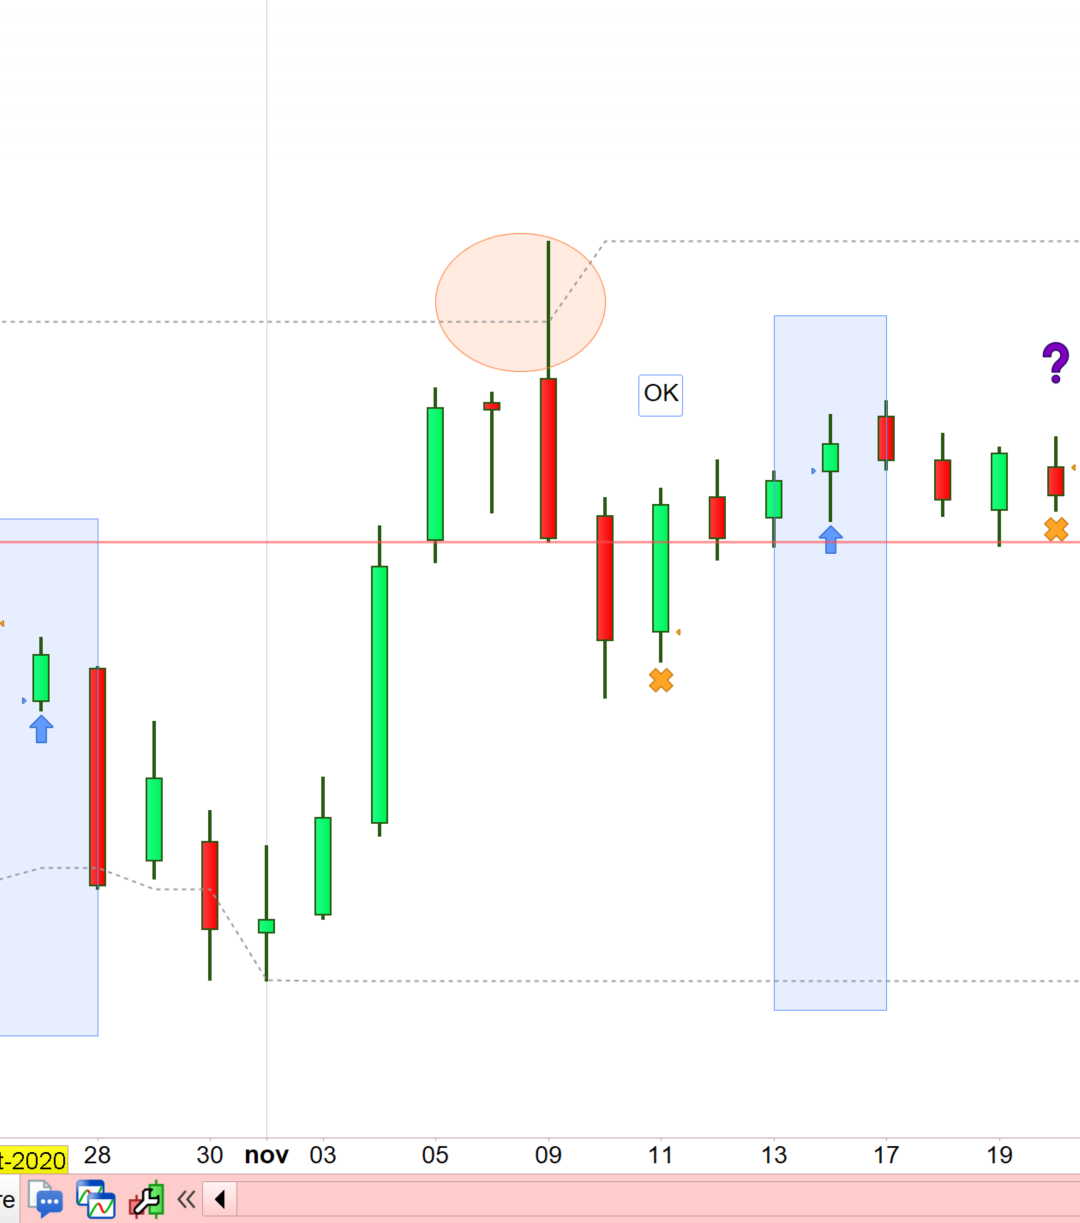
Ciao Roberto, seguirò la regola di usare il pulsante “Insert PRT” per i codici in futuro. Ho provato il Ts corretto. Ora esce, però non rispetta sempre la condizione c1, ossia non tiene sempre conto del breakout del massimo hh. Nell’immagine allegata, nel primo segnale si rispettano sia c1 che c2, nel secondo segnale solo c2.
Ho plottato per errore i massimi a 20 periodi al posto di 10, ma rimane il problema sopra riportato. Grazie
Aggiungi la riga:
myBuy = 0
tra la 14 e la 15, perché se myBuy non viene azzerato continua ad uscire.
Ciao Roberto, ho provato, ma non funziona ancora. Poi non capisco perchè alla riga 6 il close si riferisce a hh[1] e non hh. Non è: close>hh e close[1]<hh[1] identico a close crosses over hh? Grazie
CLOSE come può essere > HIGH?
Però in caso di Break Out può essere > del precedente HIGH.
Certo, mi sono sbagliato. Un ultima cosa, si potrebbe scrivere il codice con soltanto barIndex-myIndex e nBar? Oppure è fondamentale usare anche in vari punti myBuy? Grazie
Si, certo, puoi eliminare le righe 7 e 10-12, sostituendo alla riga 13 myBuy > 0 con:
barIndex <= (myIndex+nBar)
Ho provato a riscrivere il codice senza “myBuy”, come mi h
hh=highest[10](high)
nBar=10

if not longOnMarket and close>close[20] then
buy 1 contract at market
endif

if close crosses over hh[1] then
myBuy = close
myIndex = barIndex
endif
if barIndex>=(myIndex+nBar) then
myBuy = 0
endif
if longOnMarket and myBuy>0 and low<low[2]  then
sell 1 contract at market
myBuy = 0
endif
ai consigliato sopra, ma i risultati sono molto differenti. Il primo codice, quello con myBuy funziona, quindi è il secondo da rivedere. Allego i due esempi di TS con insertPRT.
hh=highest[10](high)
nBar = 10

if not longOnMarket and close>close[20] then
buy 1 contract at market
endif

if close crosses over hh[1] then
myIndex = barIndex
endif

if longOnMarket and barIndex <= (myIndex + nBar) and low<low[2]  then
sell 1 contract at market
endif
Usa il primo.
Non è obbligatorio togliere myBuy.
Ciao Roberto, chiudo questo topic, riscrivendo nel modo più semplice e chiaro l’esempio di sopra per mantenere mobile una condizione (di acquisto o vendita), sperando possa servire ad altri utenti
hh=highest[10](high)
nBar=10

if not longOnMarket and close>close[20] then
buy 1 contract at market
endif

if close crosses over hh[1] then
crossOverIndex=barIndex
cExit=1
endif

if barIndex>=(crossOverIndex+nBar) then
cExit=0
endif

if longOnMarket and cExit=1 and low<low[2] then
sell 1 contract at market
cExit=0
endif