





Strong Magnet Zones PRO: ATR Swing Zones with Strength Score
Introduction
Swing highs and swing lows are where the market has already turned once, and price often reacts again when it comes back to them. Strong Magnet Zones PRO by Thomas-Sterling turns every confirmed swing into a zone, scores how strong the turn was, tracks whether the zone has already been tested, and fires BUY and SELL signals when price rejects the latest zone in the direction of the higher-timeframe trend.
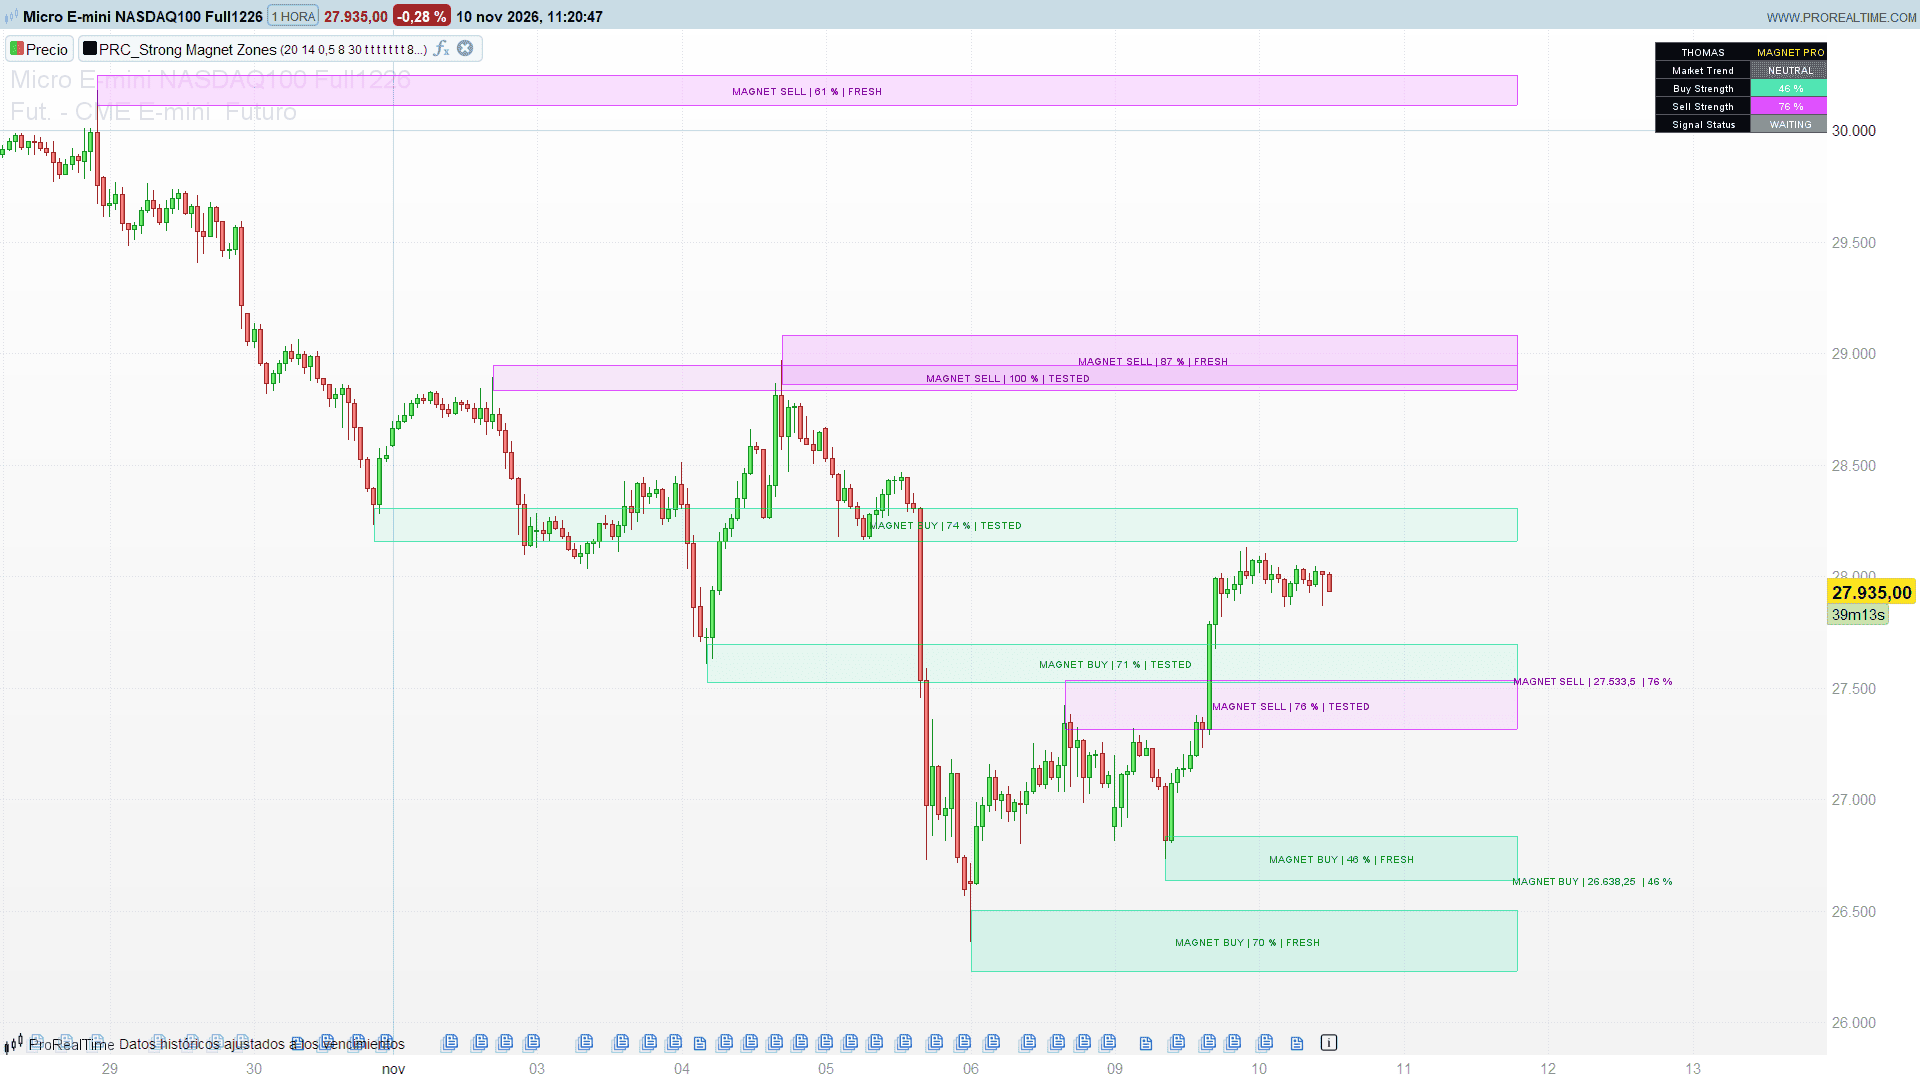
Everything is drawn on the price chart: the zones with their labels, the signals, two labels on the right with the latest buy and sell magnets, and a small dashboard.
Theory Behind the Indicator
Swings. A swing high is a bar whose high is above the highs of the 8 bars before and after it (Pivot Strength); a swing low is the mirror case. A swing is only known 8 bars after it happens, so every zone appears with that delay and never repaints.
Zones. Each swing high opens a SELL magnet zone centred on the high, and each swing low a BUY zone centred on the low. The half-height of the zone is 0.5 times the ATR(14) of the swing bar, so zones are wider in volatile markets and narrower in quiet ones. Only the 8 most recent zones are kept, and all of them extend 30 bars beyond the last bar.
Strength score. Every zone gets a score from 1 to 100 measured on the swing bar:
- it starts at 50;
- relative volume adds 12 points for every 100 % of volume above its 20-bar average (and subtracts the same below it);
- the rejection wick adds 8 points for every body length of wick (upper wick for a swing high, lower wick for a swing low), capped at 3 body lengths.
A swing made on heavy volume with a long rejection wick scores high; a quiet swing with no wick scores around 50 or less.
Freshness. A zone is FRESH until a bar trades into it for the first time; from then on it is TESTED and its fill becomes lighter.
Grey reaction zones. When a swing high is weak (score below 55), the body of the swing bar is also drawn as a grey reaction zone, a smaller area where the market paused.
Signals. A BUY signal needs four things on the same bar: the bar touches the latest BUY zone, closes above its top, closes above its open, and the higher timeframe is bullish (EMA 50 above EMA 200 on 4 hours). SELL is the mirror case on the latest SELL zone with a bearish higher timeframe. After a signal, the same side stays silent for 8 bars.
Key Features at a Glance
- Automatic BUY and SELL magnet zones on every confirmed swing, sized with the ATR.
- Strength score from 1 to 100 (relative volume and rejection wick) on every zone.
- FRESH or TESTED status, written inside each zone and shown by the fill.
- Grey reaction zones on weak swing highs.
- Rejection signals filtered by the trend of a higher timeframe, with a cooldown.
- Labels on the right with the price and strength of the latest buy and sell magnets.
- Dashboard with the higher-timeframe trend, both strengths and the signal status of the last bar.
How to Read the Indicator
- Green zone: BUY magnet, built on a swing low. Purple zone: SELL magnet, built on a swing high. Grey zone: reaction area of a weak swing high.
- Zone label “MAGNET BUY | 72% | FRESH”: buy zone with a strength of 72 that price has not visited yet.
- Lighter fill: the zone has been tested.
- BUY / SELL: price touched the latest zone and closed back out of it in the signal direction, with the higher timeframe agreeing.
- Right labels: the bottom of the latest BUY magnet and the top of the latest SELL magnet, with their strengths.
- Dashboard: Market Trend is the higher-timeframe trend (BULLISH, BEARISH or NEUTRAL). Signal Status says whether the last bar is a BUY or SELL signal, or WAITING.
Practical Applications
- Where to look for entries: a fresh, high-strength zone in the direction of the higher-timeframe trend is the best candidate for a reaction.
- Stops and targets: the far side of the zone is a natural stop reference; the nearest opposite magnet is a natural first target.
- Trend filter: with the confirmation on, counter-trend signals are filtered out. Switch it off (useMTF = 0) to see every rejection.
- Timeframe: intraday charts below 4 hours, so the confirmation timeframe is above the chart. For daily charts, change the TIMEFRAME line to a weekly timeframe.
Indicator Configuration
- pivotLen (default 8): bars on each side of a swing.
- atrLen (default 14): ATR length.
- zoneATR (default 0.5): zone half-height in ATR.
- maxZones (default 8): zones kept on the chart.
- extendBars (default 30): bars the zones extend beyond the last bar.
- showBuySell (default 1): BUY / SELL signals.
- showZoneLabels (default 1): text inside the zones.
- showMagnetPanel (default 1): labels on the right with the latest magnets.
- showDashboard (default 1): dashboard in the top right corner.
- showStrength (default 1): strength score in the zone labels.
- showGreyZones (default 1): grey reaction zones on weak swing highs.
- useMTF (default 1): higher-timeframe trend filter for the signals.
- cooldown (default 8): minimum bars between two signals of the same side.
- TIMEFRAME(4 hours) line in the code: confirmation timeframe. It must be equal to or higher than the chart timeframe.
- themeDark (default 0): 0 = text colours for a light chart background, 1 = white text for a dark one.
- labelShift (default 12): bars to the right of the zone end where the magnet labels are centred.
The Code
//---------------------------------------------------------------
// PRC_Strong Magnet Zones
// version = 0
// 09.11.2026
// Iván González @ www.prorealcode.com
// Author: Thomas-Sterling
// Sharing ProRealTime knowledge
//--------------------------------------------------------------------//
// Every confirmed swing high opens a SELL magnet zone and every
// confirmed swing low a BUY magnet zone, centred on the pivot and
// sized with the ATR. Each zone gets a strength score from the pivot
// candle (relative volume and rejection wick) and turns from FRESH to
// TESTED the first time price trades into it. Weak swing highs also
// leave a grey reaction zone over the pivot candle's body.
// BUY / SELL signals fire when price rejects the latest zone, filtered
// by the trend of a higher timeframe (EMA 50 vs EMA 200).
//--------------------------------------------------------------------//
defparam drawonlastbaronly = true

// ===================== INPUTS =====================
// --- Magnet zones ---
pivotLen = 8        // pivot strength: bars on each side (2..30)
atrLen = 14         // ATR length
zoneATR = 0.5       // zone half-width in ATR (0.1 step)
maxZones = 8        // zones kept on the chart (1..30)
extendBars = 30     // bars the zones extend beyond the last bar (5..200)
// --- Features ---
showBuySell = 1     // 1 = show BUY / SELL signals
showZoneLabels = 1  // 1 = write name, strength and freshness inside each zone
showMagnetPanel = 1 // 1 = right-side labels with the latest BUY and SELL magnets
showDashboard = 1   // 1 = market dashboard (top right)
showStrength = 1    // 1 = add the strength score to the zone labels
showGreyZones = 1   // 1 = grey reaction zones on weak swing highs
// --- Multi-timeframe confirmation ---
useMTF = 1          // 1 = BUY only with a bullish higher timeframe, SELL only with a bearish one
cooldown = 8        // minimum bars between two signals of the same side
// The confirmation timeframe is set in the TIMEFRAME line below (4 hours by default).
// It must be equal to or higher than the chart timeframe.
// --- Display ---
themeDark = 0       // 0 = light chart background, 1 = dark chart background
labelShift = 12     // bars to the right of the zone end where the magnet labels are centred

// ===================== HIGHER TIMEFRAME TREND =====================
TIMEFRAME(4 hours)
htfEma50 = ExponentialAverage[50](close)
htfEma200 = ExponentialAverage[200](close)
TIMEFRAME(default)

mtfBull = 0
mtfBear = 0
IF htfEma50 > htfEma200 THEN
   mtfBull = 1
ELSIF htfEma50 < htfEma200 THEN
   mtfBear = 1
ENDIF

// ===================== COLOURS =====================
// buy 0,220,145 | sell 210,0,255 | grey 110,110,110
IF themeDark = 1 THEN
   txR = 255
   txG = 255
   txB = 255
   bTxR = 255
   bTxG = 255
   bTxB = 255
   sTxR = 255
   sTxG = 255
   sTxB = 255
   gTxR = 255
   gTxG = 255
   gTxB = 255
ELSE
   txR = 30
   txG = 30
   txB = 30
   bTxR = 0
   bTxG = 130
   bTxB = 86
   sTxR = 130
   sTxG = 0
   sTxB = 160
   gTxR = 70
   gTxG = 70
   gTxB = 70
ENDIF

// ===================== CALCULATIONS =====================
atrV = AverageTrueRange[atrLen](close)
volAvg = average[20](volume)

// Pivot high / low confirmed pivotLen bars later: strict against the later bars, >= against the earlier ones
pivHi = 0
pivLo = 0
IF barindex >= 2 * pivotLen THEN
   IF high[pivotLen] > highest[pivotLen](high) AND high[pivotLen] >= highest[pivotLen](high)[pivotLen + 1] THEN
      pivHi = 1
   ENDIF
   IF low[pivotLen] < lowest[pivotLen](low) AND low[pivotLen] <= lowest[pivotLen](low)[pivotLen + 1] THEN
      pivLo = 1
   ENDIF
ENDIF

// ATR at the pivot candle (undefined during its warm-up: the zone exists but has no price)
atrOk = 0
zoneWidth = 0
IF barindex >= pivotLen + atrLen THEN
   atrOk = 1
   zoneWidth = atrV[pivotLen] * zoneATR
ENDIF

// Strength score of the pivot candle: relative volume + rejection wick
volRatio = 1
IF barindex >= pivotLen + 19 THEN
   IF volAvg[pivotLen] > 0 THEN
      volRatio = volume[pivotLen] / volAvg[pivotLen]
   ENDIF
ENDIF
candleBody = abs(close[pivotLen] - open[pivotLen])
bodyDiv = max(candleBody, ticksize)
wickUp = high[pivotLen] - max(open[pivotLen], close[pivotLen])
wickDn = min(open[pivotLen], close[pivotLen]) - low[pivotLen]
scoreHi = 50 + (volRatio - 1) * 12 + min(wickUp / bodyDiv, 3) * 8
scoreHi = max(1, min(100, scoreHi))
scoreLo = 50 + (volRatio - 1) * 12 + min(wickDn / bodyDiv, 3) * 8
scoreLo = max(1, min(100, scoreLo))

// ===================== ZONE STORAGE =====================
// Zones are appended to arrays; the live ones are always the last maxZones appended
// (same set as pushing and shifting the oldest). Slots are written by pure assignment
// with a scalar counter, so recalculating the live bar on every tick is harmless.
ONCE zN = 0
ONCE sellOk = 0
ONCE buyOk = 0
ONCE sellStrOk = 0
ONCE buyStrOk = 0
ONCE lastBuyBar = 0 - 1
ONCE lastSellBar = 0 - 1
ONCE nSig = 0
ONCE latSellTop = 0
ONCE latSellBot = 0
ONCE latBuyTop = 0
ONCE latBuyBot = 0
ONCE latSellStr = 0
ONCE latBuyStr = 0

// --- Sell magnet zone ---
IF pivHi = 1 THEN
   sellStrOk = 1
   latSellStr = scoreHi
   IF atrOk = 1 THEN
      sellOk = 1
      latSellTop = high[pivotLen] + zoneWidth
      latSellBot = high[pivotLen] - zoneWidth
   ELSE
      sellOk = 0
   ENDIF
   $zLeft[zN] = barindex - pivotLen
   $zTop[zN] = latSellTop
   $zBot[zN] = latSellBot
   $zOk[zN] = sellOk
   $zType[zN] = 0 - 1
   $zTest[zN] = 0
   $zStr[zN] = latSellStr
   zN = zN + 1
ENDIF

// --- Buy magnet zone ---
IF pivLo = 1 THEN
   buyStrOk = 1
   latBuyStr = scoreLo
   IF atrOk = 1 THEN
      buyOk = 1
      latBuyTop = low[pivotLen] + zoneWidth
      latBuyBot = low[pivotLen] - zoneWidth
   ELSE
      buyOk = 0
   ENDIF
   $zLeft[zN] = barindex - pivotLen
   $zTop[zN] = latBuyTop
   $zBot[zN] = latBuyBot
   $zOk[zN] = buyOk
   $zType[zN] = 1
   $zTest[zN] = 0
   $zStr[zN] = latBuyStr
   zN = zN + 1
ENDIF

// --- Freshness: the first bar that trades into a zone marks it TESTED ---
// (high only rises and low only falls during a bar, so the flag is tick-safe)
zFirst = max(0, zN - maxZones)
IF zN > 0 THEN
   FOR k = zFirst TO zN - 1 DO
      IF $zOk[k] = 1 THEN
         IF high >= $zBot[k] AND low <= $zTop[k] THEN
            $zTest[k] = 1
         ENDIF
      ENDIF
      $zLab[k] = 1
   NEXT
ENDIF

// --- Grey reaction zone on weak swing highs (pivot candle body) ---
IF showGreyZones = 1 AND pivHi = 1 AND latSellStr < 55 THEN
   greyTop = max(open[pivotLen], close[pivotLen])
   greyBot = min(open[pivotLen], close[pivotLen])
   IF greyTop > greyBot THEN
      $zLeft[zN] = barindex - pivotLen
      $zTop[zN] = greyTop
      $zBot[zN] = greyBot
      $zOk[zN] = 1
      $zType[zN] = 0
      $zTest[zN] = 0
      $zStr[zN] = latSellStr
      $zLab[zN] = 0
      zN = zN + 1
   ENDIF
ENDIF

// ===================== BUY / SELL SIGNALS =====================
buyTouch = 0
IF buyOk = 1 THEN
   IF low <= latBuyTop AND high >= latBuyBot THEN
      buyTouch = 1
   ENDIF
ENDIF
sellTouch = 0
IF sellOk = 1 THEN
   IF high >= latSellBot AND low <= latSellTop THEN
      sellTouch = 1
   ENDIF
ENDIF

buyMtfOk = 1
sellMtfOk = 1
IF useMTF = 1 THEN
   buyMtfOk = mtfBull
   sellMtfOk = mtfBear
ENDIF

buyCoolOk = 0
IF lastBuyBar < 0 OR barindex - lastBuyBar > cooldown THEN
   buyCoolOk = 1
ENDIF
sellCoolOk = 0
IF lastSellBar < 0 OR barindex - lastSellBar > cooldown THEN
   sellCoolOk = 1
ENDIF

buySig = 0
IF buyTouch = 1 AND close > latBuyTop AND close > open AND buyMtfOk = 1 AND buyCoolOk = 1 THEN
   buySig = 1
   lastBuyBar = barindex
ENDIF
sellSig = 0
IF sellTouch = 1 AND close < latSellBot AND close < open AND sellMtfOk = 1 AND sellCoolOk = 1 THEN
   sellSig = 1
   lastSellBar = barindex
ENDIF

// Signal history (pure assignment with a scalar counter: tick-safe)
IF buySig = 1 THEN
   $sgBar[nSig] = barindex
   $sgDir[nSig] = 1
   $sgY[nSig] = low
   $sgAtr[nSig] = atrV
   nSig = nSig + 1
ENDIF
IF sellSig = 1 THEN
   $sgBar[nSig] = barindex
   $sgDir[nSig] = 0 - 1
   $sgY[nSig] = high
   $sgAtr[nSig] = atrV
   nSig = nSig + 1
ENDIF

// ===================== DRAWING =====================
IF islastbarupdate THEN
   zRight = barindex + extendBars

   // --- Zones ---
   IF zN > 0 THEN
      FOR k = zFirst TO zN - 1 DO
         IF $zOk[k] = 1 THEN
            zt = $zTop[k]
            zb = $zBot[k]
            zl = $zLeft[k]
            IF $zType[k] = 1 THEN
               cR = 0
               cG = 220
               cB = 145
               bdA = 166
               fA = 31
               lR = bTxR
               lG = bTxG
               lB = bTxB
            ELSIF $zType[k] = 0 - 1 THEN
               cR = 210
               cG = 0
               cB = 255
               bdA = 166
               fA = 31
               lR = sTxR
               lG = sTxG
               lB = sTxB
            ELSE
               cR = 110
               cG = 110
               cB = 110
               bdA = 89
               fA = 26
               lR = gTxR
               lG = gTxG
               lB = gTxB
            ENDIF
            IF $zTest[k] = 1 THEN
               fA = 18
            ENDIF
            DRAWRECTANGLE(zl, zt, zRight, zb) COLOURED(cR, cG, cB, bdA) FILLCOLOR(cR, cG, cB, fA)

            IF showZoneLabels = 1 AND $zLab[k] = 1 THEN
               zx = round((zl + zRight) / 2)
               zy = (zt + zb) / 2
               zs = round($zStr[k])
               zTy = $zType[k]
               zTs = $zTest[k]
               IF showStrength = 1 THEN
                  IF zTy = 1 AND zTs = 0 THEN
                     DRAWTEXT("MAGNET BUY | #zs#% | FRESH", zx, zy, SansSerif, Standard, 10) COLOURED(lR, lG, lB, 255)
                  ELSIF zTy = 1 THEN
                     DRAWTEXT("MAGNET BUY | #zs#% | TESTED", zx, zy, SansSerif, Standard, 10) COLOURED(lR, lG, lB, 255)
                  ELSIF zTy = 0 - 1 AND zTs = 0 THEN
                     DRAWTEXT("MAGNET SELL | #zs#% | FRESH", zx, zy, SansSerif, Standard, 10) COLOURED(lR, lG, lB, 255)
                  ELSIF zTy = 0 - 1 THEN
                     DRAWTEXT("MAGNET SELL | #zs#% | TESTED", zx, zy, SansSerif, Standard, 10) COLOURED(lR, lG, lB, 255)
                  ELSIF zTs = 0 THEN
                     DRAWTEXT("MAGNET REACTION | #zs#% | FRESH", zx, zy, SansSerif, Standard, 10) COLOURED(lR, lG, lB, 255)
                  ELSE
                     DRAWTEXT("MAGNET REACTION | #zs#% | TESTED", zx, zy, SansSerif, Standard, 10) COLOURED(lR, lG, lB, 255)
                  ENDIF
               ELSE
                  IF zTy = 1 AND zTs = 0 THEN
                     DRAWTEXT("MAGNET BUY | FRESH", zx, zy, SansSerif, Standard, 10) COLOURED(lR, lG, lB, 255)
                  ELSIF zTy = 1 THEN
                     DRAWTEXT("MAGNET BUY | TESTED", zx, zy, SansSerif, Standard, 10) COLOURED(lR, lG, lB, 255)
                  ELSIF zTy = 0 - 1 AND zTs = 0 THEN
                     DRAWTEXT("MAGNET SELL | FRESH", zx, zy, SansSerif, Standard, 10) COLOURED(lR, lG, lB, 255)
                  ELSIF zTy = 0 - 1 THEN
                     DRAWTEXT("MAGNET SELL | TESTED", zx, zy, SansSerif, Standard, 10) COLOURED(lR, lG, lB, 255)
                  ELSIF zTs = 0 THEN
                     DRAWTEXT("MAGNET REACTION | FRESH", zx, zy, SansSerif, Standard, 10) COLOURED(lR, lG, lB, 255)
                  ELSE
                     DRAWTEXT("MAGNET REACTION | TESTED", zx, zy, SansSerif, Standard, 10) COLOURED(lR, lG, lB, 255)
                  ENDIF
               ENDIF
            ENDIF
         ENDIF
      NEXT
   ENDIF

   // --- BUY / SELL signals (full history) ---
   IF showBuySell = 1 AND nSig > 0 THEN
      FOR q = 0 TO nSig - 1 DO
         sx = $sgBar[q]
         sa = $sgAtr[q]
         IF $sgDir[q] = 1 THEN
            DRAWARROWUP(sx, $sgY[q] - 0.3 * sa) COLOURED(0, 220, 145, 255)
            DRAWTEXT("BUY", sx, $sgY[q] - 0.9 * sa, SansSerif, Bold, 10) COLOURED(0, 160, 105, 255)
         ELSE
            DRAWARROWDOWN(sx, $sgY[q] + 0.3 * sa) COLOURED(210, 0, 255, 255)
            DRAWTEXT("SELL", sx, $sgY[q] + 0.9 * sa, SansSerif, Bold, 10) COLOURED(150, 0, 190, 255)
         ENDIF
      NEXT
   ENDIF

   // --- Right-side magnet panel ---
   IF showMagnetPanel = 1 THEN
      mx = zRight + labelShift
      IF buyOk = 1 THEN
         bPx = round(latBuyBot / ticksize) * ticksize
         bSt = round(latBuyStr)
         DRAWTEXT("MAGNET BUY | #bPx# | #bSt#%", mx, latBuyBot, SansSerif, Bold, 10) COLOURED(bTxR, bTxG, bTxB, 255)
      ENDIF
      IF sellOk = 1 THEN
         sPx = round(latSellTop / ticksize) * ticksize
         sSt = round(latSellStr)
         DRAWTEXT("MAGNET SELL | #sPx# | #sSt#%", mx, latSellTop, SansSerif, Bold, 10) COLOURED(sTxR, sTxG, sTxB, 255)
      ENDIF
   ENDIF

   // --- Market dashboard (top right) ---
   IF showDashboard = 1 THEN
      pzS = 10
      rowH = pzS + 8
      w0 = 95
      w1 = 82
      pW = w0 + w1
      pL = 0 - 85 - pW
      pM = pL + w0
      pRt = pL + pW
      pT = 0 - 12
      x0 = pL + w0 / 2
      x1 = pM + w1 / 2
      yT1 = pT - rowH
      yT2 = yT1 - rowH
      yT3 = yT2 - rowH
      yT4 = yT3 - rowH
      yT5 = yT4 - rowH
      IF mtfBull = 1 THEN
         trnR = 0
         trnG = 220
         trnB = 145
      ELSIF mtfBear = 1 THEN
         trnR = 210
         trnG = 0
         trnB = 255
      ELSE
         trnR = 110
         trnG = 110
         trnB = 110
      ENDIF
      // left column and header: black cells
      DRAWRECTANGLE(pL, pT, pRt, yT1) ANCHOR(TOPRIGHT, XSHIFT, YSHIFT) COLOURED(80, 80, 80, 255) FILLCOLOR(0, 0, 0, 255)
      DRAWRECTANGLE(pL, yT1, pM, yT2) ANCHOR(TOPRIGHT, XSHIFT, YSHIFT) COLOURED(80, 80, 80, 255) FILLCOLOR(0, 0, 0, 255)
      DRAWRECTANGLE(pL, yT2, pM, yT3) ANCHOR(TOPRIGHT, XSHIFT, YSHIFT) COLOURED(80, 80, 80, 255) FILLCOLOR(0, 0, 0, 255)
      DRAWRECTANGLE(pL, yT3, pM, yT4) ANCHOR(TOPRIGHT, XSHIFT, YSHIFT) COLOURED(80, 80, 80, 255) FILLCOLOR(0, 0, 0, 255)
      DRAWRECTANGLE(pL, yT4, pM, yT5) ANCHOR(TOPRIGHT, XSHIFT, YSHIFT) COLOURED(80, 80, 80, 255) FILLCOLOR(0, 0, 0, 255)
      // right column: coloured cells
      DRAWRECTANGLE(pM, yT1, pRt, yT2) ANCHOR(TOPRIGHT, XSHIFT, YSHIFT) COLOURED(80, 80, 80, 255) FILLCOLOR(trnR, trnG, trnB, 255)
      DRAWRECTANGLE(pM, yT2, pRt, yT3) ANCHOR(TOPRIGHT, XSHIFT, YSHIFT) COLOURED(80, 80, 80, 255) FILLCOLOR(0, 220, 145, 179)
      DRAWRECTANGLE(pM, yT3, pRt, yT4) ANCHOR(TOPRIGHT, XSHIFT, YSHIFT) COLOURED(80, 80, 80, 255) FILLCOLOR(210, 0, 255, 179)
      DRAWRECTANGLE(pM, yT4, pRt, yT5) ANCHOR(TOPRIGHT, XSHIFT, YSHIFT) COLOURED(80, 80, 80, 255) FILLCOLOR(trnR, trnG, trnB, 204)

      yR0 = pT - rowH / 2
      yR1 = yT1 - rowH / 2
      yR2 = yT2 - rowH / 2
      yR3 = yT3 - rowH / 2
      yR4 = yT4 - rowH / 2
      DRAWTEXT("THOMAS", x0, yR0, SansSerif, Bold, pzS) ANCHOR(TOPRIGHT, XSHIFT, YSHIFT) COLOURED(255, 255, 255, 255)
      DRAWTEXT("MAGNET PRO", x1, yR0, SansSerif, Bold, pzS) ANCHOR(TOPRIGHT, XSHIFT, YSHIFT) COLOURED(255, 235, 59, 255)
      DRAWTEXT("Market Trend", x0, yR1, SansSerif, Standard, pzS) ANCHOR(TOPRIGHT, XSHIFT, YSHIFT) COLOURED(255, 255, 255, 255)
      DRAWTEXT("Buy Strength", x0, yR2, SansSerif, Standard, pzS) ANCHOR(TOPRIGHT, XSHIFT, YSHIFT) COLOURED(255, 255, 255, 255)
      DRAWTEXT("Sell Strength", x0, yR3, SansSerif, Standard, pzS) ANCHOR(TOPRIGHT, XSHIFT, YSHIFT) COLOURED(255, 255, 255, 255)
      DRAWTEXT("Signal Status", x0, yR4, SansSerif, Standard, pzS) ANCHOR(TOPRIGHT, XSHIFT, YSHIFT) COLOURED(255, 255, 255, 255)
      IF mtfBull = 1 THEN
         DRAWTEXT("BULLISH", x1, yR1, SansSerif, Bold, pzS) ANCHOR(TOPRIGHT, XSHIFT, YSHIFT) COLOURED(255, 255, 255, 255)
      ELSIF mtfBear = 1 THEN
         DRAWTEXT("BEARISH", x1, yR1, SansSerif, Bold, pzS) ANCHOR(TOPRIGHT, XSHIFT, YSHIFT) COLOURED(255, 255, 255, 255)
      ELSE
         DRAWTEXT("NEUTRAL", x1, yR1, SansSerif, Bold, pzS) ANCHOR(TOPRIGHT, XSHIFT, YSHIFT) COLOURED(255, 255, 255, 255)
      ENDIF
      IF buyStrOk = 1 THEN
         dbS = round(latBuyStr)
         DRAWTEXT("#dbS#%", x1, yR2, SansSerif, Bold, pzS) ANCHOR(TOPRIGHT, XSHIFT, YSHIFT) COLOURED(255, 255, 255, 255)
      ELSE
         DRAWTEXT("N/A", x1, yR2, SansSerif, Bold, pzS) ANCHOR(TOPRIGHT, XSHIFT, YSHIFT) COLOURED(255, 255, 255, 255)
      ENDIF
      IF sellStrOk = 1 THEN
         dsS = round(latSellStr)
         DRAWTEXT("#dsS#%", x1, yR3, SansSerif, Bold, pzS) ANCHOR(TOPRIGHT, XSHIFT, YSHIFT) COLOURED(255, 255, 255, 255)
      ELSE
         DRAWTEXT("N/A", x1, yR3, SansSerif, Bold, pzS) ANCHOR(TOPRIGHT, XSHIFT, YSHIFT) COLOURED(255, 255, 255, 255)
      ENDIF
      IF buySig = 1 THEN
         DRAWTEXT("BUY SIGNAL", x1, yR4, SansSerif, Bold, pzS) ANCHOR(TOPRIGHT, XSHIFT, YSHIFT) COLOURED(255, 255, 255, 255)
      ELSIF sellSig = 1 THEN
         DRAWTEXT("SELL SIGNAL", x1, yR4, SansSerif, Bold, pzS) ANCHOR(TOPRIGHT, XSHIFT, YSHIFT) COLOURED(255, 255, 255, 255)
      ELSE
         DRAWTEXT("WAITING", x1, yR4, SansSerif, Bold, pzS) ANCHOR(TOPRIGHT, XSHIFT, YSHIFT) COLOURED(255, 255, 255, 255)
      ENDIF
   ENDIF
ENDIF

RETURN