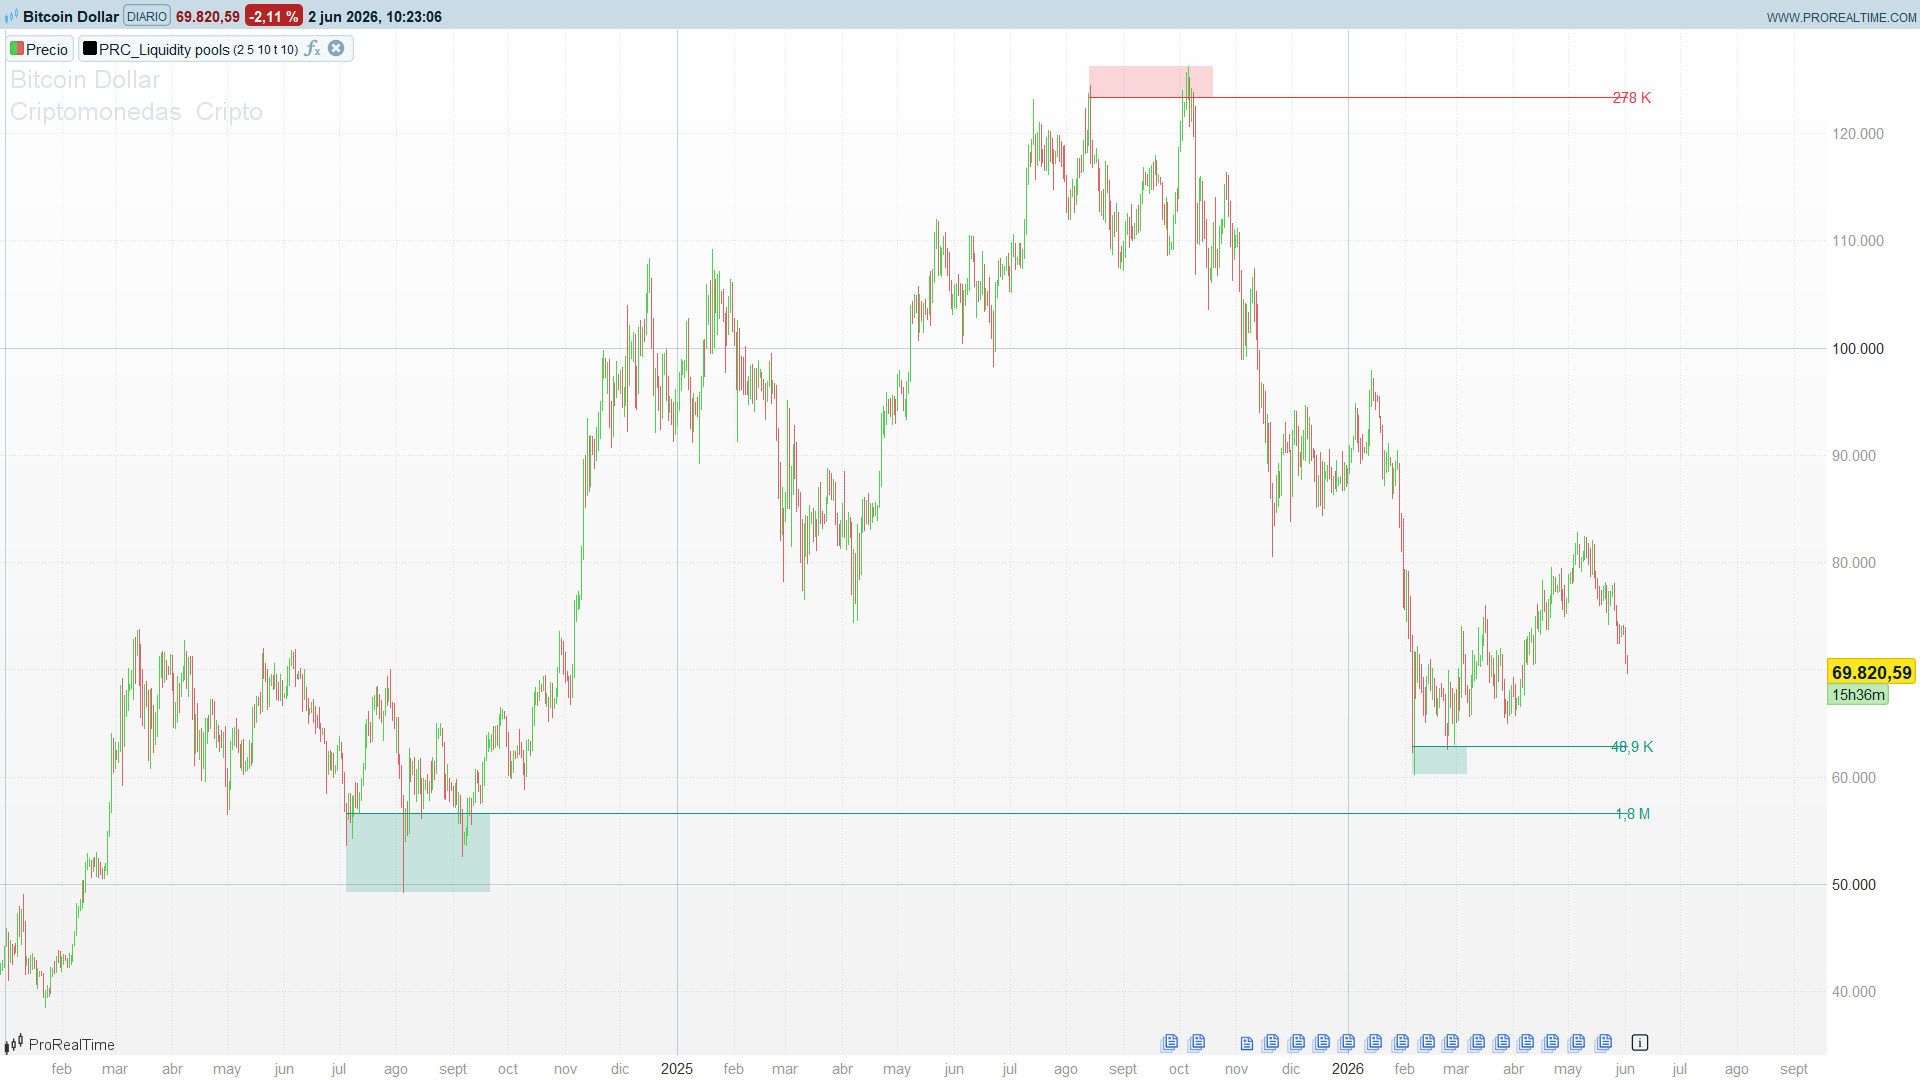
Liquidity Pools
LuxAlgo’s Liquidity Pools is a price-action indicator built on a simple, durable idea: the levels that price keeps coming back to and rejecting are the levels where resting orders pile up. Every time a wick pokes into a level and the body fails to close through it, that rejection leaves stops and limit orders stacked just beyond — a pool of liquidity. The indicator finds those repeatedly-tested levels, measures the volume that has been “trapped” in the wicks testing them, and draws a zone whose label reports that accumulated volume. When price finally closes through the zone, the pool is considered swept and the zone disappears.
This is a close cousin of LuxAlgo’s Liquidity Swings, but the detection mechanism is genuinely different and worth understanding. Liquidity Swings hangs zones off centred pivots (N bars left, N bars right) and counts how many times each pivot is re-touched. Liquidity Pools never computes a pivot. Instead it carries a moving reference candle — one for the upside, one for the downside — whose level persists as long as price respects it, and it counts the wicks that pierce that level without the body closing through. The reference is what makes the indicator feel “live”: the level tracks the market and only commits to a zone once enough spaced-out contacts have accumulated and price has walked away from the last touch.
Theory Behind the Indicator
1. The reference candle
The engine keeps two reference candles:
hst— the upside reference, a potential resistance pool. Its level ishstT = max(open, close)(the top of the body) and its extreme ishstH = high(the wick).lst— the downside reference, a potential support pool. Its level islstB = min(open, close)(the bottom of the body) and its extreme islstL = low.
When price prints a clean new high — high > hstH and the body confirms it — the upside reference jumps to the current candle and the contact count resets. The same happens, mirrored, for the downside. Between resets the reference holds still, and that stillness is what lets the indicator recognise the same level being tested again and again.
2. Counting contacts
A contact is a wick that pierces the reference level without the body closing through it:
hWick = high > hstT and max(open, close) <= hstT
A raw wick is not enough on its own. The indicator only counts a contact when three conditions line up: the wick happened, the reference level had been stable for at least two bars, and at least gapCount bars have passed since the previous contact. That last guard is what stops a single long consolidation from being counted as dozens of contacts — each touch has to be a genuinely separate visit to the level.
Once the contact count reaches cNum (default 2), the level is a candidate pool.
3. Confirmation — letting price walk away
A candidate is not drawn immediately. The indicator waits until price has moved wait bars (default 10) away from the most recent contact — a crossover of the “bars since last contact” counter over the wait threshold — and only then, provided the close is on the correct side of the level, does it commit the zone. The confirmation delay is deliberate: it filters out levels that are still being actively traded and keeps only the ones price has left behind, which are the ones with stranded liquidity.
4. Trapped volume — the weight of the pool
This is what separates a Liquidity Pool from an ordinary support/resistance line. For every bar, the indicator adds the fraction of that bar’s volume that occurred beyond the level:
trappedVolume += max(high - hstT, 0) / (high - low) * volume
A bar whose wick barely tags the level contributes a sliver; a bar that traded heavily above the level before being rejected contributes most of its volume. The accumulated figure — printed as the zone’s label — is a proxy for how much liquidity is resting at that level. Two zones at similar prices are not equal: the one carrying 2.3M of trapped volume is a far more attractive target for a liquidity grab than the one carrying 180K.
5. Mitigation — the sweep
A zone stays alive and projects its level forward until price closes through its far extreme — above hstH for a resistance pool, below lstL for a support pool. To avoid flickering on a single marginal close, the original uses a two-bar grace: the zone is only removed after the close has stayed through the extreme for two consecutive bars. Once removed, the zone is gone; the indicator shows only live pools, each extended to the present.
That removal event is the liquidity sweep — the moment the resting orders get executed — and it is exactly what the companion screener keys on.
How to Read the Indicator
- The zone is the pool; the number is its size. A green zone below price is a support pool — resting buy-side liquidity (and stops under it). A red zone above price is a resistance pool. The label is the trapped volume: read it as the magnitude of liquidity at that level, and prioritise the heavy ones.
- A live zone is a magnet, not a wall. Price tends to be drawn toward unresolved pools, not repelled by them — the liquidity is the reason price goes there. A nearby heavy pool is a likely destination, not a guaranteed turning point.
- The disappearance is the event. When a zone vanishes, the pool has been swept. That is the actionable moment: the stops have been run. What happens next — sharp reversal (the classic stop-hunt-and-reverse) or clean continuation — is the trade decision; the indicator’s job is to tell you the sweep happened.
- Spacing controls character. Tight settings (
cNum = 2) surface many shallow pools and suit intraday scalping around liquidity. Wider settings (cNum = 3–4) keep only the levels the market has tested repeatedly — higher-timeframe pools worth more.
Practical Applications
- Sweep-and-reverse entries. Wait for a support pool to be swept (zone disappears, price closes below it), then look for price to reclaim the level. The trapped-volume label pre-qualifies the setup: the heavier the swept pool, the more meaningful the stop-run.
- Target selection. When in a position, the nearest heavy pool on the profit side is a rational first target — price is being pulled toward that resting liquidity.
- Avoiding obvious stop placement. A cluster of support pools marks where everyone else’s stops sit. Sizing or placing stops with that map in mind keeps you out of the pools most likely to be hunted.
- Screening for fresh sweeps. The companion ProScreener flags instruments that have swept a pool within the last N bars, in either direction — a ready-made watchlist of just-triggered liquidity events.
Indicator Configuration
cNum2 – Minimum contacts before a level qualifies as a pool. Higher = fewer, more-tested zones
gapCount5 – Minimum bars between two counted contacts
waitBars10 – Bars price must walk away from the last contact before the zone is confirmed
volTog1 – Show the trapped-volume labels
maxZones10 – Cap on live zones per side (ProBuilder addition; the original is uncapped)
Code
//----------------------------------------------
//PRC_Liquidity Pools [LuxAlgo]
//Pools de liquidez: niveles tocados N veces + volumen atrapado
//version = 1
//02.06.2026
//Ivan Gonzalez @ www.prorealcode.com
//Sharing ProRealTime knowledge
//----------------------------------------------
defparam drawonlastbaronly = true

// === INPUTS ===
cNum     = 2     // Zone Contact Amount (contactos minimos para validar el pool)
gapCount = 5     // Bars Required Between Each Contact
waitBars = 10    // Confirmation Bars (espera antes de dibujar la zona)
volTog   = 1     // 1 = mostrar etiquetas de volumen
maxZones = 10    // cap de zonas vivas por lado

// === COLORES (RGB) ===
bullR = 8
bullG = 153
bullB = 129
bearR = 242
bearG = 54
bearB = 69

MAXZ = 20        // cota superior de slots del pool por lado

// === VELA ACTUAL ===
cTop = max(open, close)
cBot = min(open, close)

// === ESTADO PERSISTENTE (init en la primera barra) ===
// Solo se conservan los campos del UDT 'data' realmente usados:
//   referencia ALTA (resistencia): hstH (mecha=top caja), hstT (cuerpo=nivel/linea), hstBi (x izq)
//   referencia BAJA (soporte):     lstB (cuerpo=nivel/linea), lstL (mecha=bottom caja), lstBi (x izq)
if barindex = 0 then
   hstH  = high
   hstT  = cTop
   hstBi = barindex
   lstB  = cBot
   lstL  = low
   lstBi = barindex
   hCount = 0
   lCount = 0
   lastHwick = barindex
   lastLwick = barindex
   hiVol = 0
   loVol = 0
   bsHw = 0
   bsLw = 0
endif

// === 1. RESET DE REFERENCIA ALTA ===
if high > hstH and (cTop > hstH or cTop < hstT) then
   if hCount > 1 then
      lstB  = cBot
      lstL  = low
      lstBi = barindex
      loVol = 0
      lCount = 0
   endif
   hstH  = high
   hstT  = cTop
   hstBi = barindex
   hiVol = 0
   hCount = 1
   lastHwick = barindex
endif

// === 2. RESET DE REFERENCIA BAJA ===
if low < lstL and (cBot < lstL or cBot > lstB) then
   if lCount > 1 then
      hstH  = high
      hstT  = cTop
      hstBi = barindex
      hiVol = 0
      hCount = 0
   endif
   lstB  = cBot
   lstL  = low
   lstBi = barindex
   loVol = 0
   lCount = 1
   lastLwick = barindex
endif

// === 3. CONTEO DE CONTACTOS ===

hWick = 0
if high > hstT and cTop <= hstT then
   hWick = 1
endif
lWick = 0
if low < lstB and cBot >= lstB then
   lWick = 1
endif

// Se confirma el contacto una barra despues.

if barindex > 2 and hWick[1] = 1 and hstT[1] = hstT[2] and bsHw[1] > gapCount then
   hCount = hCount + 1
   lastHwick = barindex - 1
endif
if barindex > 2 and lWick[1] = 1 and lstB[1] = lstB[2] and bsLw[1] > gapCount then
   lCount = lCount + 1
   lastLwick = barindex - 1
endif

// Barras desde el ultimo contacto
bsHw = abs(lastHwick - barindex)
bsLw = abs(lastLwick - barindex)

// === 4. TRACKING DE EXTREMOS ===
if high > hstH then
   hstH = high
endif
if low < lstL then
   lstL = low
endif

// === 5. VOLUMEN ATRAPADO ===
rng = high - low
if rng > 0 then
   hstVol = max(high - hstT, 0) / rng * volume
   lstVol = max(lstB - low, 0) / rng * volume
else
   hstVol = 0
   lstVol = 0
endif
hiVol = hiVol + hstVol
loVol = loVol + lstVol

// === 6. CONFIRMACION + CREACION ZONA BEAR (resistencia) ===

bearTrig = 0
if hCount >= cNum and bsHw > waitBars and bsHw[1] <= waitBars and close < hstT then
   bearTrig = 1
endif

if bearTrig = 1 then
   // Merge: si el nivel cae dentro de una zona bear viva, fusiona en vez de duplicar.
   mergedB = 0
   for i = 0 to MAXZ - 1 do
      if $bzAct[i] = 1 and mergedB = 0 then
         if hstT <= $bzTop[i] and hstT >= $bzLvl[i] then
            if hstH > $bzTop[i] then
               $bzTop[i] = hstH
            endif
            $bzRight[i] = barindex
            $bzVol[i] = $bzVol[i] + hiVol
            $bzBorn[i] = barindex
            mergedB = 1
         endif
      endif
   next
   // Si no fusiona: slot libre o, si se alcanzo el cap, eviccion FIFO (menor born).
   if mergedB = 0 then
      slot = -1
      cnt = 0
      oldIdx = -1
      oldBorn = 0
      for i = 0 to MAXZ - 1 do
         if $bzAct[i] = 1 then
            cnt = cnt + 1
            if oldIdx = -1 or $bzBorn[i] < oldBorn then
               oldBorn = $bzBorn[i]
               oldIdx = i
            endif
         else
            if slot = -1 then
               slot = i
            endif
         endif
      next
      if cnt >= maxZones then
         slot = oldIdx
      endif
      if slot = -1 then
         slot = oldIdx
      endif
      $bzLvl[slot]   = hstT
      $bzTop[slot]   = hstH
      $bzLeft[slot]  = hstBi
      $bzRight[slot] = barindex
      $bzVol[slot]   = hiVol
      $bzAct[slot]   = 1
      $bzState[slot] = 0
      $bzBorn[slot]  = barindex
   endif
endif

// === 7. CONFIRMACION + CREACION ZONA BULL (soporte) ===
bullTrig = 0
if lCount >= cNum and bsLw > waitBars and bsLw[1] <= waitBars and close > lstB then
   bullTrig = 1
endif

if bullTrig = 1 then
   mergedL = 0
   for i = 0 to MAXZ - 1 do
      if $lzAct[i] = 1 and mergedL = 0 then
         if lstB >= $lzBot[i] and lstB <= $lzLvl[i] then
            if lstL < $lzBot[i] then
               $lzBot[i] = lstL
            endif
            $lzRight[i] = barindex
            $lzVol[i] = $lzVol[i] + loVol
            $lzBorn[i] = barindex
            mergedL = 1
         endif
      endif
   next
   if mergedL = 0 then
      slot = -1
      cnt = 0
      oldIdx = -1
      oldBorn = 0
      for i = 0 to MAXZ - 1 do
         if $lzAct[i] = 1 then
            cnt = cnt + 1
            if oldIdx = -1 or $lzBorn[i] < oldBorn then
               oldBorn = $lzBorn[i]
               oldIdx = i
            endif
         else
            if slot = -1 then
               slot = i
            endif
         endif
      next
      if cnt >= maxZones then
         slot = oldIdx
      endif
      if slot = -1 then
         slot = oldIdx
      endif
      $lzLvl[slot]   = lstB
      $lzBot[slot]   = lstL
      $lzLeft[slot]  = lstBi
      $lzRight[slot] = barindex
      $lzVol[slot]   = loVol
      $lzAct[slot]   = 1
      $lzState[slot] = 0
      $lzBorn[slot]  = barindex
   endif
endif

// === 8. MITIGACION / DELECION ===
// Bear: barrida cuando el cierre supera el extremo superior de la zona.
for i = 0 to MAXZ - 1 do
   if $bzAct[i] = 1 then
      if close > $bzTop[i] then
         if $bzState[i] < 0 then
            $bzAct[i] = 0
         endif
         $bzState[i] = $bzState[i] - 1
      else
         $bzState[i] = 0
      endif
   endif
next
// Bull: barrida cuando el cierre pierde el extremo inferior de la zona.
for i = 0 to MAXZ - 1 do
   if $lzAct[i] = 1 then
      if close < $lzBot[i] then
         if $lzState[i] < 0 then
            $lzAct[i] = 0
         endif
         $lzState[i] = $lzState[i] - 1
      else
         $lzState[i] = 0
      endif
   endif
next

// === 9. RENDER (solo en la ultima barra) ===
if islastbarupdate then

   // --- ZONAS BEAR (resistencia / liquidez en maximos) ---
   for i = 0 to MAXZ - 1 do
      if $bzAct[i] = 1 then
         lvl  = $bzLvl[i]
         topY = $bzTop[i]
         lft  = $bzLeft[i]
         rgt  = $bzRight[i]
         drawrectangle(lft, topY, rgt, lvl) coloured(bearR, bearG, bearB, 0) fillcolor(bearR, bearG, bearB, 51)
         drawsegment(lft, lvl, barindex, lvl) coloured(bearR, bearG, bearB) style(line, 1)
         if volTog = 1 then
            vv = $bzVol[i]
            if vv >= 1000000 then
               vShow = round(vv / 100000) / 10
               drawtext("#vShow#M", barindex + 3, lvl) coloured(bearR, bearG, bearB)
            elsif vv >= 1000 then
               vShow = round(vv / 100) / 10
               drawtext("#vShow#K", barindex + 3, lvl) coloured(bearR, bearG, bearB)
            else
               vShow = round(vv)
               drawtext("#vShow#", barindex + 3, lvl) coloured(bearR, bearG, bearB)
            endif
         endif
      endif
   next

   // --- ZONAS BULL (soporte / liquidez en minimos) ---
   for i = 0 to MAXZ - 1 do
      if $lzAct[i] = 1 then
         lvl  = $lzLvl[i]
         botY = $lzBot[i]
         lft  = $lzLeft[i]
         rgt  = $lzRight[i]
         drawrectangle(lft, lvl, rgt, botY) coloured(bullR, bullG, bullB, 0) fillcolor(bullR, bullG, bullB, 51)
         drawsegment(lft, lvl, barindex, lvl) coloured(bullR, bullG, bullB) style(line, 1)
         if volTog = 1 then
            vv = $lzVol[i]
            if vv >= 1000000 then
               vShow = round(vv / 100000) / 10
               drawtext("#vShow#M", barindex + 3, lvl) coloured(bullR, bullG, bullB)
            elsif vv >= 1000 then
               vShow = round(vv / 100) / 10
               drawtext("#vShow#K", barindex + 3, lvl) coloured(bullR, bullG, bullB)
            else
               vShow = round(vv)
               drawtext("#vShow#", barindex + 3, lvl) coloured(bullR, bullG, bullB)
            endif
         endif
      endif
   next

endif

return