

Build a simple indicators dashboard with prorealtime v10.3
Recently on forum, someone ask me how to build a dashboard with multiple indicators informations. While it is not possible with version 10.2, the new graphical instructions of the new prorealtime version 10.3 can build an informative dashboard with any useful information you can imagine. Let’s see how to build a simple one in this blog article.
A dashboard to rule them all
With an informative dashboard, you can “compile” a lot of informations in one place. It also mean that you don’t even need to add the bunch of indicators you need in your every day trading on chart. A simple dashboard indicator will take the place of all the other ones.
Let’s say you need to define the actual trend of the current timeframe, you only need to test if a fast moving average is above or below a slower one. This information could be compiled as a simple arrow on the bottom right corner of your screen, with no need of moving average on your chart. That’s the main purpose of a dashboard and I gonna give you some examples in the next paragraphs.
Important things to do first
Firstly, we define that we want to do graphical instruction only one time, on the last bar only (the actual one) with the drawonlastbaronly instruction ; otherwise, the prorealtime graphical engine will draw our dashboard on every bar instead while loading the whole data history and it will be the mess on your screen! 🙂
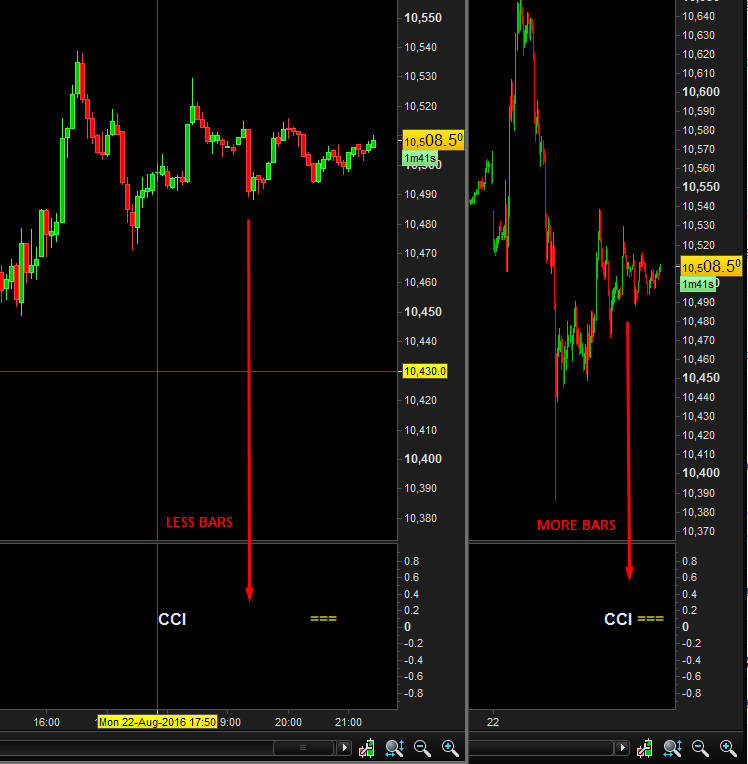
defparam drawonlastbaronly=trueSecondly, to draw things on screen we need X and Y coordinates. With prorealtime, these informations are stored in “barindex” for the X coordinate and in price for the Y one. So it’s pretty much easy to know in real time where to place our graphical components. But, because these coordinates are not absolute ones, we need to define an X offset to be sure that multiple components will not overlaid on other ones.
While we are zooming in on chart, less “barindex” will be visible and distance between them (between candlesticks) will widen. And because of the same behaviour or the barindex, while zooming out, more barindex will be visible and more candlesticks too, and distance between them will be very tight. Our X offset will reduce this effect, but can’t delete it completely. That’s how we have to deal with these no-absolute (no pixels ones!) coordinates .. when we want to align text on the same row.
Xoffset = 40This parameter could be an external one that you can modify at will to have the best result on screen. It depends mainly of the quantity of candlesticks drawn on your chart window.
Another solution would be to write the label with the information in the same line, but the entire line would have the same colour (indicator label + information). Since I want to introduce you how to make a nice looking dashboard with different components, let’s keep it that way.
First example, oversold/overbought information of an oscillator
Let’s take the Commodity Channel Index (CCI) indicator and retrieve its overbought and oversold informations. If the oscillator is above 100, it’s overbought, under -100 = oversold, otherwise we only test if it is declining or rising and write it up on screen:
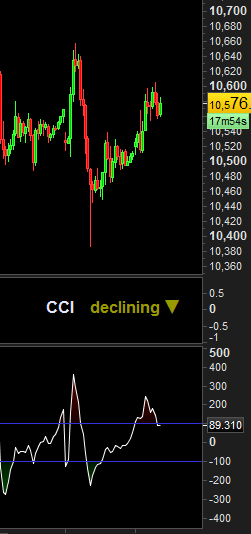
Here is the code for this first example :
//---CCI
//label
DRAWTEXT("CCI",barindex-Xoffset,0.1,SansSerif,Bold,16)coloured(230,230,250)
//informations
if myCCI<-100 then
 DRAWTEXT("oversold",barindex-10,0.1,SansSerif,Bold,16)coloured(153,0,0)
elsif myCCI>100 then
 DRAWTEXT("overbought",barindex-10,0.1,SansSerif,Bold,16)coloured(0,153,0)
elsif myCCI>=myCCI[1] then
 DRAWTEXT("rising ▲",barindex-10,0.1,SansSerif,Bold,16)coloured(153,153,0)
elsif myCCI<=myCCI[1] then
 DRAWTEXT("declining ▼",barindex-10,0.1,SansSerif,Bold,16)coloured(153,153,0)
endif
The Y coordinate is near 0 because PRT don’t know in advance where you put your graphical component. By default, an indicator will always open at 0. So if you draw something at 1 or 10 on Y coordinate, you will not see it, unless you change yourself the scale of the indicator by hand.
Second example, add the current trend information
By comparing 2 simple moving average, a fast one over or below a slower one, we define if the current trend is bullish or bearish:
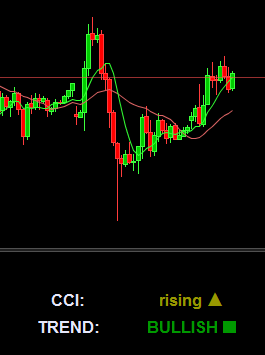
Simple and effective code with a nice looking on chart!
//---Trend
//label
DRAWTEXT("TREND:",barindex-Xoffset,-0.4,SansSerif,Bold,16)coloured(230,230,250)
//informations
if maFast<maSlow then
 DRAWTEXT("BEARISH ■",barindex-10,-0.4,SansSerif,Bold,16)coloured(153,0,0)
else
 DRAWTEXT("BULLISH ■",barindex-10,-0.4,SansSerif,Bold,16)coloured(0,153,0)
endif
Adding a signal from the current above conditions
Simple condition for a signal:
- if the CCI is rising and the trend is bullish, then it’s a buy signal
- if the CCI is declining and the trend is bearish, it’s a sell signal
By adding some variables in our previous conditions, we don’t need to make the whole test once again:
//---CCI
//label
DRAWTEXT("CCI:",barindex-Xoffset,0.1,SansSerif,Bold,16)coloured(230,230,250)
//informations
if myCCI<-100 then
 DRAWTEXT("oversold",barindex-10,0.1,SansSerif,Bold,16)coloured(153,0,0)
elsif myCCI>100 then
 DRAWTEXT("overbought",barindex-10,0.1,SansSerif,Bold,16)coloured(0,153,0)
elsif myCCI>=myCCI[1] then
 DRAWTEXT("rising ▲",barindex-10,0.1,SansSerif,Bold,16)coloured(153,153,0)
CCIstate = 1
elsif myCCI<=myCCI[1] then
 DRAWTEXT("declining ▼",barindex-10,0.1,SansSerif,Bold,16)coloured(153,153,0)
CCIstate = -1
endif

//---Trend
//label
DRAWTEXT("TREND:",barindex-Xoffset,-0.4,SansSerif,Bold,16)coloured(230,230,250)
//informations
if maFast<maSlow then
 DRAWTEXT("BEARISH ■",barindex-10,-0.4,SansSerif,Bold,16)coloured(153,0,0)
 TRENDstate = -1
else
 DRAWTEXT("BULLISH ■",barindex-10,-0.4,SansSerif,Bold,16)coloured(0,153,0)
 TRENDstate = 1
endif
I added the “CCIstate” and “TRENDstate” to store the conditions needed to draw the trades signals.
Now we can add our signals labels in the dashboard:

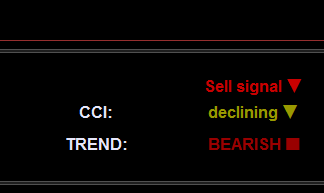
and the signals code:
//---Signals
//buy signal
if TRENDstate=1 and CCIstate=1 then
 DRAWTEXT("Buy signal ▲",barindex-10,0.5,SansSerif,Bold,16)coloured(0,200,0)
elsif TRENDstate=-1 and CCIstate=-1 then
 DRAWTEXT("Sell signal ▼",barindex-10,0.5,SansSerif,Bold,16)coloured(200,0,0)
else
 DRAWTEXT("No signal, wait..",barindex-10,0.5,SansSerif,Bold,16)coloured(180,180,0)
endif
As usual, the complete code can be downloaded below this post. Hope you like it. If you need assistance to make your own dashboard with your own ideas, you can create a new forum topic and I’ll help you there.